Building a Simplex Hotspot (MMDVM) Pi-Star Software
Contents:
- Introduction
- Introduction
- What is Pi-Star?
- DMR Dashboards
- DMR ID
- Hotspot Frequency
- Hotspot Talk Groups – Static vs Dynamic
- Pi-Star - Software
- WiFi Configuration
- Pi-Star Configuration
- Backup and Restore the Pi-Star Configuration
- Restoring a Broken System
- Pi-Star Updates
- Radio Configuration
- WiFi Auto Access Point
- Restoring a Broken System
- Further Reading
[Top][Home]
Introduction
This is a simple setup guide to install Pi-Star on your Simplex Hotspot. Credit for much
of this material goes to VK4MWL in his setup guide,
VK4MWL-VKDMR_Hotspot_Setup_v1.3.pdf
[Top][Home]
Introduction
This document is intended to be a simple setup guide to get your Simplex Hotspot up and working on the
VKDMR network.
This guide as simple as possible I have omitted the more complicated setup options and additional
digital modes that can be setup on the Hotspot.
It is assumed that you already have a DMR radio that can connect and communicate on one of the VKDMR
repeaters and you have the capability to program additional zones, channels and talk groups into your DMR radio.
[Top][Home]
What is Pi-Star?
Pi-Star is a software application the run on a Raspberry Pi and communicated with the hotspot radio hardware
on one side and the internet on the other.
Pi-Star come with a user friendly menu system to allow the easiest possible setup.
[Top][Home]
DMR Dashboards
The hotspot make informatio about it's functioning on a local web browser. This can usually be accessed
by type "pistar" into the browser search bar.
Quite separatly, VKDMR make information available on the external web.
There are two VKDMR dashboards, one for public repeaters (http://rpt.vkdmr.com/) and another one for
Hotspots (http://hot.vkdmr.com/). Once your Hotspot is setup correctly it will show up on the Hotspot
dashboard against your callsig
[Top][Home]
DMR ID
To operate a DMR staion you are required to have a unique ID.
If you do not already have a Digital Radio ID, the registration page is:
https://radioid.net/account/register
The Radio and the Hotspot's ID's must match to be operational.
Only one ID is necessary with additional devices using a two digit suffix.
“Hotspots: **** MMDVM, DV4MINI, openSPOT, DVMEGA, and all other hotspot type devices do NOT require a
separate ID, use an existing ID only, check the hotspot tab on your account dashboard, do NOT request an ID for
them ****
If you own more than one hotspot, use your personal ID number and add a 2 digit suffix, example: Radio ID 3020111,
use 302011101, 302011102, etc.
NEVER operate multiple hotspot within range of each other on the same frequency even with different ID's. This will
create loops backs and cause network issues in most cases.
Hotspots do not require ID's when communicating with repeaters, only hotspots. See:
https://www.radioid.net/faq#!
If you are not sure of you DMR ID you can look it up at
https://database.radioid.net/database/search#!
A point to note: There is little security with the use of Radio ID's. The VK-DMR server only checks
that the ID matches the registered callsign in the RadioID.net database.
[Top][Home]
Hotspot Frequency
There are two frequencies allocated in the 70cm Band for Internet Gateways (Reference “WIA Amateur
Band Plans”). Choose one of these frequencies.
439.125MHz & 439.150MHz
The frequency ranges 435,000MHz to 438,000MHz 145,800MHz to 146,000MHz are reserved for Satellite.
Consult the WIrless Institute of Australia's band plan
www.wia.org.au/members/bandplans/about/ if yoiu wish to select alternative frequenies.
The radio chip, typically a Analog Devices's ADF7021, in these hotspots are very
low power transmitters, however that does not mean they cannot
cause interference, especially to sensative, high gain recievers typically used to receive satellites.
The radio chip (Modem) details for your hotspot can be found by logging in via secure shell and
running the find-medem command:
My MMDVM hotspot respondes:
[Top][Home]
Hotspot Talk Groups – Static vs Dynamic
Hotspots can be configured with specific talk groups. These are called static talk groups, as they are
always monitored and retransmitted on your hotspot frequency.
To listen to talk groups that are not configured as static you need to use dynamic talk groups. These are
accessed by keying up your radio on the talk group you want to use. Your hotspot will then receive any
transmissions on that talk group. After 15 seconds of inactivity the hotspot will return to monitoring static
talk groups. This timeout is set by the “RelinkTime” parameter.
As a starting point I suggest configuring the following talk groups as static: -
- 5 - time slot 1/All repeaters
- 13 – time slot 1/Worldwide English
- 53 – time slot 1/Chat
- 113 – time slot 1/QSY to here after establishing DX on TG1 or TG13
- 123 – time slot 1/ QSY to here after establishing DX on TG1 or TG13
- 505 - time slot 2/All VK repeaters
- 3084 - time slot 2/All QLD repeaters
These are configured using the option string below that is added to the DMR configuration on the
configuration web page. This is explained further in the configuration section.
RelinkTime=15;UserLink=1;TS1_1=5;TS1_2=13;TS1_3=53;TS1_4=113;TS1_5=123;TS2_1=505;TS2_2=3804;
[Top][Home]
Pi-Star - Software
Pi-Star is the operating system that runs on the Raspberry Pi Zero W, it is a modified linux build that is
specifically setup with a number of applications and a configuration webpage.
The Raspberry Pi Zero W connects to the DMR network via your home wireless internet.
Pi-Star needs to be installed onto the SD Card which is then inserted into the Raspberry Pi.
You will need a USB MicroSD Card reader to complete the next task. The below one is made by Kingston.
Setting up the MicroSD Card
- Download the latest version for Pi-Star “Pi-Star_RPi_V4.1.2_20-May-2020.zip” at the time of writing.
- Unzip the Pi-Star_RPi_V4.1.2_20-May-2020.zip file. Take note of the location of the “Pi-
Star_RPi_V4.1.2_20-May-2020.img” file
- Download “Raspberry Pi Imager for Windows” from https://www.raspberrypi.org/downloads/
- Install the “Raspberry Pi Imager for Windows” application and run it.
- Click on “Choose OS”, scroll to the bottom and select “Use custom”
- Locate the “Pi-Star_RPi_V4.1.2_20-May-2020.img” file you extracted in step 2 and select it.
- Plug the MicroSD Card into the card reader and plug the card reader into the computer
- Click “Choose SD C....”
- Select the SD Card.
- Click “WRITE”
- Click “YES”
- Wait until the image is finished writing and verifying to the MicroSD Card
- Click continue and unplug and plug the SD Card reader from the computer
[Top][Home]
WiFi Configuration
- Insert the MicroSD card into the card reader and connect to the USB port of the computer
- Open File Explorer and you should see a new drive letter
- Within the root directory create a new text file (Right click New>Text Document)
- Right click on the new file and select properties.
Change the name of the file to “wpa_supplicant.conf” and click “OK”
- Click “Yes” to the warning message
- Right click on the “wpa_supplicant.conf” file and select “Properties”
- Click “Change”
- Click “More Apps” and select notepad
- Double click on the “wpa_supplicant.conf” file to open it in Notepad
- Cut and paste in the following text into the Notepad window
- Replace the string MyWiFiNetwork with your home WiFi SSID
- Replace the string "aVeryStrongPassword" with you home WiFi password
- Close Notepad and click Save to save the file
- Remove the MicroSD card from the reader and install it into the Raspberry Pi. It will be almost flush
with the case when installed correctly.
- Plugin the power to the Raspberry Pi and turn it on
[Top][Home]
Pi-Star Configuration
Proceed to the first boot. The installation process expands file systems and sets up
the Raspberial Operating System and Pi-Star ready to be configured.
- The Raspbery Pi takes approximately 5 minutes to boot after power on
- Once booted, using a browser on your workstation, click on this link "http://pi-star/admin/" and you will be prompted
for a username and password
- Enter the user name : pi-star and password : raspberry
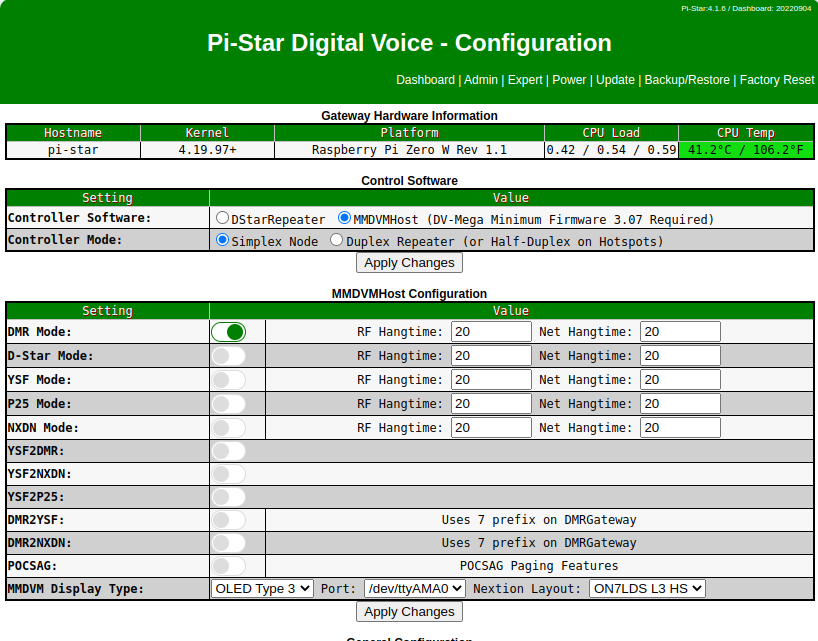
- Click on Configuration in the top left corner
- Configure the Control Software section as below and click “Apply Changes”
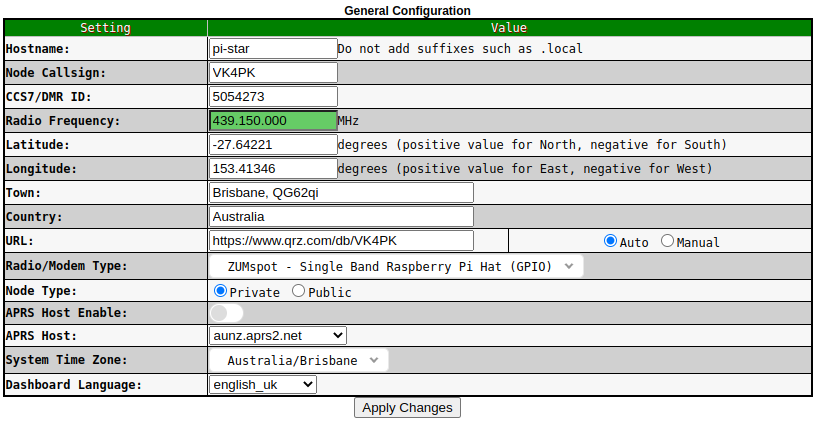
- Configure the General Configuration section as below and click “Apply Changes” (note it takes a
little while for the page to refresh and restart the services before you can continue)
- Callsign
- Frequency (439.125MHz or 439.150MHz)
- Your Latitude, Longitude, Town, Grid Location
(Find your Coordinates and Grid with this website
https://www.qrz.com/gridmapper)
- Change URL to “Auto”
- Change the Radio/Modem Type to “STM32-DVM / MMDVM_HS - Raspberry Pi Hat (GPIO)”
- Change the APRS host to “queensland.aprs2.net”
- Change the timezone to “Australia/Brisbane”
- After applying the configuration the services will restart and you will now see the MMDVMHost
Configuration section. Update the below settings and apply changes.
- Turn on “DMR Mode”
- Change the MMDVM Display to “OLED Type 3”
- After applying the changes there will be a new option in the General Configuration section,
“CCS7/DMR ID:” enter you DMR ID and apply changes
- After the services restart configure the following options in the “DMR Configuration” section and
apply changes.
- DMR Master “DMR+_IPSC2-VKHOTSPOT”
- Add the following string to DMR+ Network:
“StartRef=4000;RelinkTime=15;UserLink=1;TS1_1=5;TS1_2=13;TS1_3=53;TS1_4=113;TS1_5=123;TS2_1=505;TS2_2=3804;”
- DMR ESSID: - change the drop down to “01”

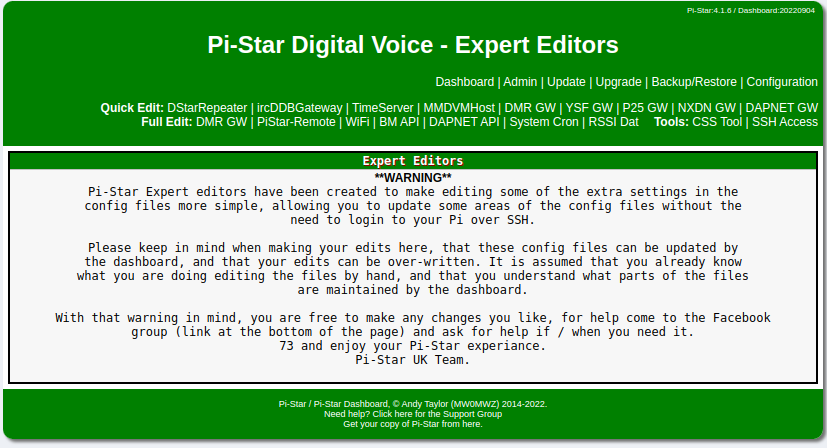
- Navigate to http://pi-star/admin/expert/edit_mmdvmhost.php
- Scroll down to the DMR section and change “Beacons”, “BeaconInterval” and “BeaconDuration” to 0

- The Firewall can be left as per the defaults and should look like this:

- Update the admin password on your Pi-Star
- Complete a Pi-Star Update described below:
Pi-Star Updates
- Complete a Configuration Backup describled below:
Backup and Restore the Pi-Star Configuration
[Top][Home]
Backup and Restore the Pi-Star Configuration
Note that this does not perform a full system update, however, it does save the
all the Pi-Star configuration data which will save you having to go through the
configuration process if a rebuild is required. It is also handy to be able to
restore to a known "good" configuration if you "mess up" while mofifing the
working configuration.
- To create a back of the configuration select the configuration page and
click on Download Configuration.
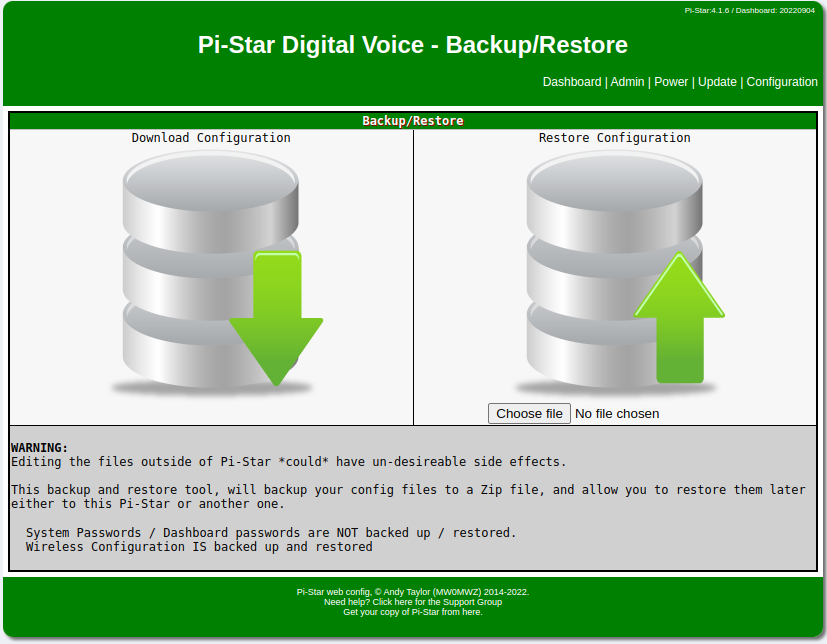
- Be sure to save the file downloaded in a safe location
- The restore option will request the file location of the backup file.
- This will restore the configuration only.
- It good practice to perform a Backup after an Update
[Top][Home]
Restoring a Broken System
Unfortuantly, SD-Cards are not designed for continious read write operations that
Pi-Star requires, so SD-Cards can "wareout" on busy hotsopts.
At this point it is advisable to rebuild from scratch and restore from the Pi-Star
Configuration Backup, however, you can try the following.
Login to the hotspot via secure shell or directly by attaching a keyboard and monitor.
Repeat the process if it did not work fully the first time.
[Top][Home]
Pi-Star Updates
From time to time you will need to complete an update on the Pi-Star.
The update will update various operating system and Pi-Star application components.
- Navigate to http://pi-star/admin/configure.php and enter your user “pi-star” and password
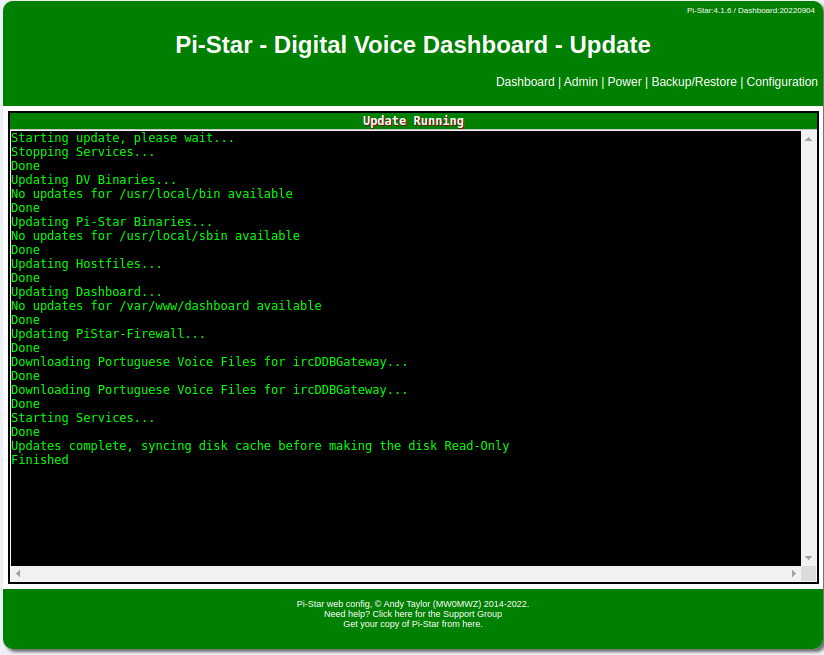
- Click on Update
- You will see a page like the below image, wait until you see “Finished” before navigating away.
- It is good practice to perform a Backup after an update.
[Top][Home]
Radio Configuration
You will need to configure an additional channelRestoring a Broken System and associated talkgroups in your codeplug and download
to the DMR radio. This new channel will use the TX/ RX Frequency that you configured on the Hotspot
configuration page. (439.125MHz or 439.150MHz)
Important : Set you radio to low power before transmitting on your Hotspot frequency as they are
usually close by and can be overdriven by high power causing intermodulation or potentially
damage to your Hotspot.
Once this is configured select your hotspot channel and TalkGroup 9990 (Parrot) and do a test
transmission.
You should see information light up on the display of the hotspot and hear your voice back from the parrot.
You will also see info in the Hotspot Dashboard while you are transmitting.
20Bit Error Rate (BER)
DMR is digital radio and encodes your voice as ones and zeros over RF. Bit Error Rate or BER is the ratio
of bit errors to total bits sent.
High BER indicates that the Hotspot (or any repeater) is not receiving your signal correctly.
In the case of Hotspots they use cheap transmitter chips and sometimes need a frequency offset to be
setup to correct high BER.
To see the BER of your transmissions access the Pi-Star dashboard http://pi-star/ and look for your call
sign in the “Local RF Activity” section. (You may need to do a test transmission to the parrot to generate a
log entry)
If you are experiencing higher than 1% BER you can adjust the frequency offsets in the expert configuration
pages:
- Leave the Dashboard open and open another browser tab or window using this link http://pi-
star/admin/expert/edit_mmdvmhost.php
- Scroll down the page to the “Modem” section and locate “RXOffset”
- Adjust the offsets in +/-100 step offsets and test using the TG 9
parrot
- Monitor the BER in the dashboard and adjusting in increments of +/-50 the +/-10 to reduce the BER
below 1%
Further info about this process can be found on the webpages:
https://amateurradionotes.com/pi-star-notes.htm#tuningber
by Toshen, KE0FHS
and this Facebook post,
https://www.facebook.com/groups/743300879089972/permalink/2408935665859810/ by Glenn, VK4NGA.
[Top][Home]
WiFi Auto Access Point
If the Pi-Star fails to connect to a known WiFi network it will automatically create it own WiFi Access
Point(AP). This is a failsafe to allow you to connect to Pi-Star and re-configure the WiFi settings.
Follow these steps to connect:
- Turn on the Pi-Star and wait approximately 2-3 minutes
- Using a laptop click on the small WiFi icon in the bottom right corner of the screen.
- You should see a new WiFi SSID listed called “Pi-Star-Setup”. Click on it and click connect.
- Enter the password “raspberry”
- Open the following link in a web browser http://pi-star.local
It should open up the configuration page.
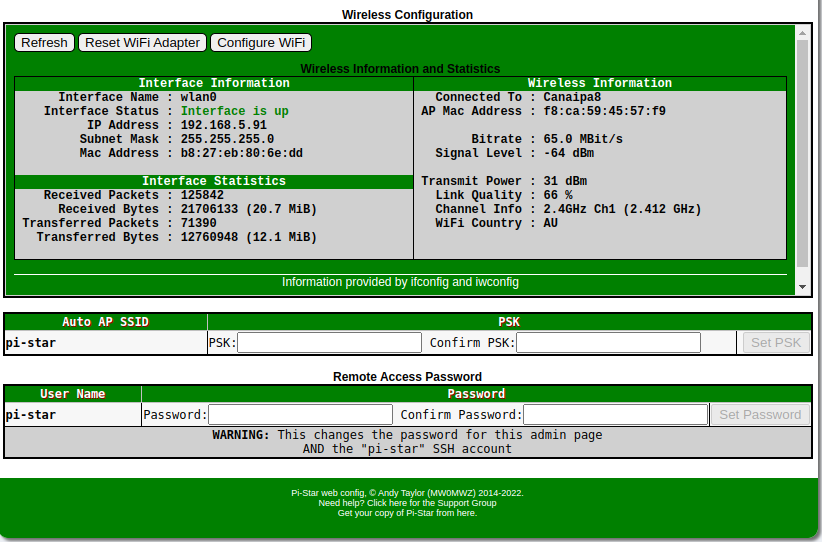
- Scroll down to the Wireless Configuration section and click “Configure WiFi”
- Click “Scan for Networks”
- You should see a list of available networks. Click “Select” on your home WiFi network
- Change the Country Code to “AU” and enter your WiFi password in the “PSK” field.
- Click “Save and Connect”
- Restart the Pi-Star
- Reconnect your laptop to your Home WiFi
- Click on this link to connect to the Pi-Star Dashboard http://pi-star.local
[Top][Home]
Restoring a Broken System
Unfortuantly, SD-Cards are not designed for continious read write operations that
Pi-Star requires, so SD-Cards can "wareout" on busy hotsopts.
At this point it is advisable to rebuild from scratch and restore from the Pi-Star
Configuration Backup, however, you can try the following.
Login to the hotspot via secure shell or directly by attaching a keyboard and monitor.
Repeat the process if it did not work fully the first time.
[Top][Home]
Further Reading
Andy Taylor's, MW0MWZ, Pi-Star website where you can download the Pi-Star application.
Pi-Star is a software image built initially for the Raspberry Pi
The design concept is simple, provide the complex services and configuration for
Digial Voice on Amateur radio in a way that makes it easily accessable to anyone
just starting out, but make it configurable enough to be interesting for those of
us who cant help but tinker.
https://www.pistar.uk/
https://forum.pistar(MW0MWZ.uk/
https://amateurradionotes.com/pi-star.htm#learningpistar
[Top][Home]
Glenn Lyons VK4PK
glenn@LyonsComputer.com.au
Ver:gnl20220909 - pre published v0.9