The data layer, or layer 2, is the second layer of the seven-layer OSI model of
computer networking. This layer is the protocol layer that transfers data
between adjacent network nodes in a wide area network (WAN) or between nodes on
the same local area network (LAN) segment
The data link layer has three main functions:

MiMo Antenna Explained
MiMo is an acronym for "multi in multi out". Most wireless broadband modems sold these days contain MiMo technology. MiMo technology enables the device to dynamically set up many signal paths to optimise transmission and reception to the tower. When a 4G modem is used in a 4G coverage area and, if the 4G signal is strong enough, the modem will switch to MiMo mode usually resulting in higher data speed.
https://www.comnet.com.au/Antennas/MiMo-Antenna-Explained
https://www.telcoantennas.com.au/site/how-does-mimo-work
MIMO can be sub-divided into three main categories:
Precoding is multi-stream beamforming, in the narrowest definition. In more
general terms, it is considered to be all spatial processing that occurs at
the transmitter. In (single-stream) beamforming, the same signal is emitted
from each of the transmit antennas with appropriate phase and gain weighting
such that the signal power is maximized at the receiver input. The benefits
of beamforming are to increase the received signal gain – by making signals
emitted from different antennas add up constructively – and to reduce the
multipath fading effect. In line-of-sight propagation, beamforming results
in a well-defined directional pattern. However, conventional beams are not
a good analogy in cellular networks, which are mainly characterized by
multipath propagation. When the receiver has multiple antennas, the transmit
beamforming cannot simultaneously maximize the signal level at all of the
receive antennas, and precoding with multiple streams is often beneficial.
Note that precoding requires knowledge of channel state information (CSI) at
the transmitter and the receiver.
Spatial Multiplexing requires MIMO antenna configuration. In spatial
multiplexing,[33][34] a high-rate signal is split into multiple lower-rate
streams and each stream is transmitted from a different transmit antenna in
the same frequency channel. If these signals arrive at the receiver antenna
array with sufficiently different spatial signatures and the receiver has
accurate CSI, it can separate these streams into (almost) parallel channels.
Spatial multiplexing is a very powerful technique for increasing channel
capacity at higher signal-to-noise ratios (SNR). The maximum number of spatial
streams is limited by the lesser of the number of antennas at the transmitter
or receiver. Spatial multiplexing can be used without CSI at the transmitter,
but can be combined with precoding if CSI is available. Spatial multiplexing
can also be used for simultaneous transmission to multiple receivers, known
as space-division multiple access or multi-user MIMO, in which case CSI is
required at the transmitter.[35] The scheduling of receivers with different
spatial signatures allows good separability.
Diversity Coding techniques are used when there is no channel knowledge at the
transmitter. In diversity methods, a single stream (unlike multiple streams in
spatial multiplexing) is transmitted, but the signal is coded using techniques
called space-time coding. The signal is emitted from each of the transmit
antennas with full or near orthogonal coding. Diversity coding exploits the
independent fading in the multiple antenna links to enhance signal diversity.
Because there is no channel knowledge, there is no beamforming or array gain
from diversity coding. Diversity coding can be combined with spatial
multiplexing when some channel knowledge is available at the transmitter.
Source: https://en.wikipedia.org/wiki/MIMO
[Top][Home]
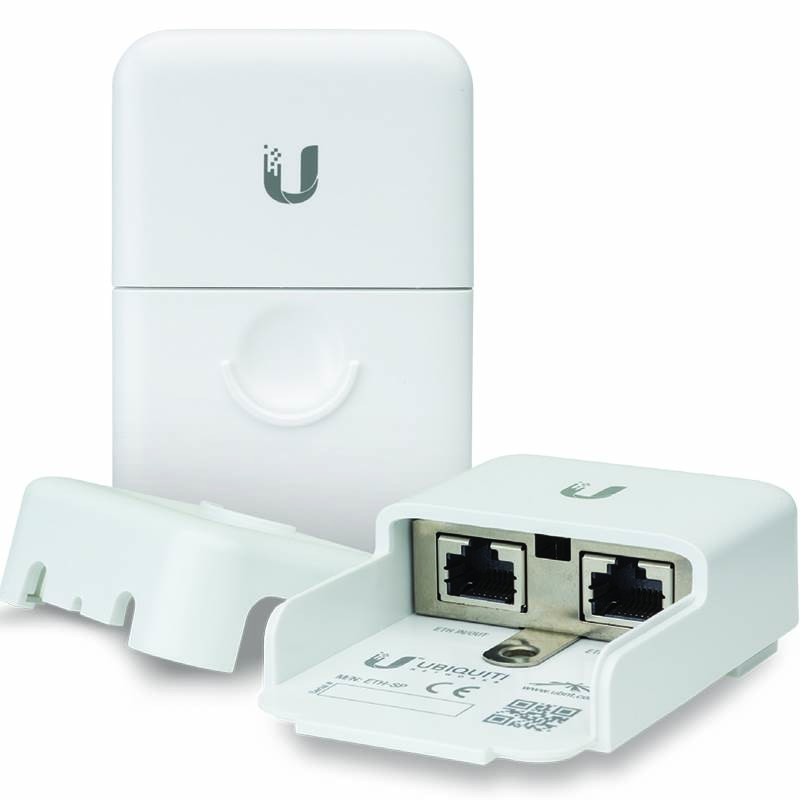
It is imperative that all Ubiquiti™ devices mounted externally
on a pole/tower use a mechanism to ground the device
For added protection, it is recommend to install two GigE PoE surge protectors.
Install the first surge protector within one meter of the M900 data port,
and install the second surge protector at the ingress point of the location
housing the wired network equipment.
Ethernet Surge Protector PoE+100M RJ-45 Model: ETH-SP $18.84 inc GST ea
https://dl.ubnt.com/datasheets/ETH-SP/Ethernet_Surge_Protector_DS.pdf
[Top][Home]
Notes to the Order:
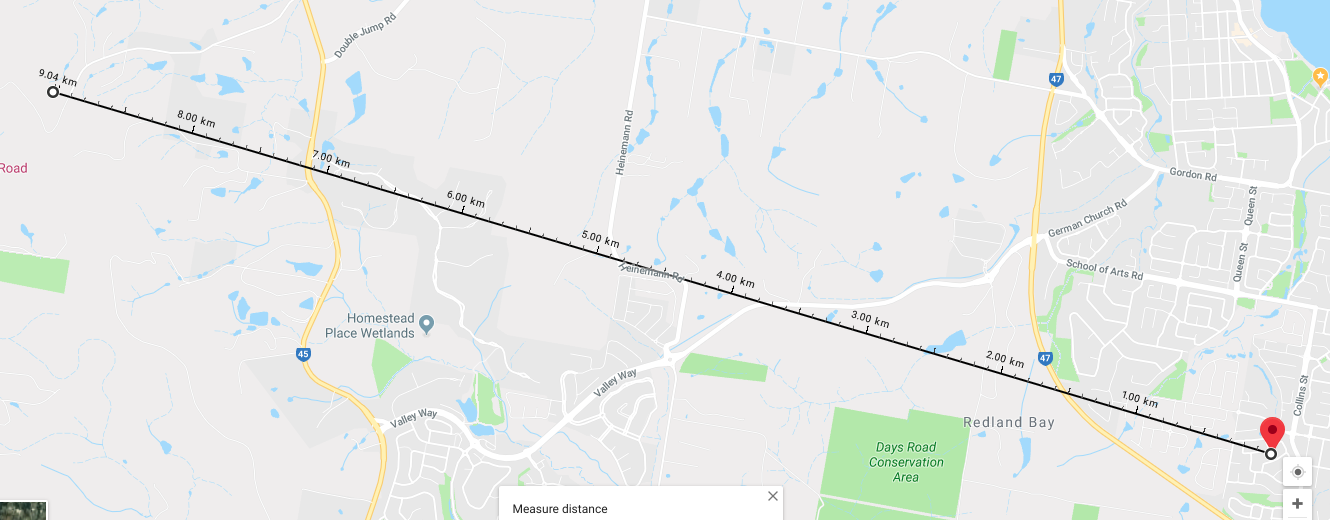
The length of Mt Cotton data cable has been estimates as half the height of the
tower, assumed to be 34 meter(100 ft), plus 3 meters from tower to the
earthed bulkhead of the radio shed.
Measurements must be confirmed on site.
The length of the hosts site cabling is assumed to be 20 meters.
Measurements must be confirmed on site.
The M900 comes with a AC mains to 24 volt power injector, I have specified an
additional DC 9 to 36 volt power injector so the link can remain active during
maions power outages. This will have to be supplied with 12 volts DC. I consider
it good policy to rely upon the DC power source over mains.
The earth bulkhead plate in the shed will have to provide for a data cable
penetration and the affixing of a ETH-SP-G2 surge protection device.
Quote from Freenet Warehouse Pty Ltd
https://ubwh.com.au/
(Trading as UBWH Australia and UBIQUITI WAREHOUSE)
2 x Rocket M900 365.56 $731.12
4 x Ethernet Surge Protector $18.84 ea $75.36
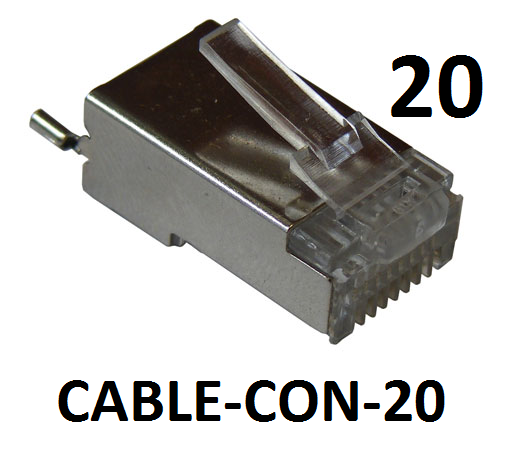
1 x TOUGHConnector - box of 100 $80.97
1 x POE 9-36 DC to 24V DC $50.39
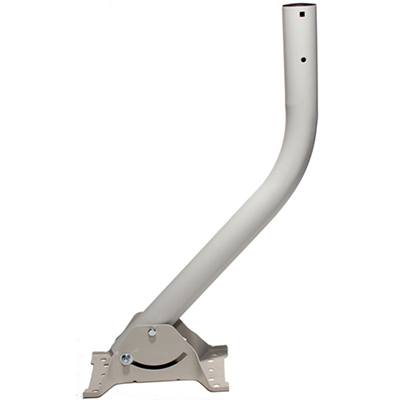
2 x Universal Arm Bracket 12.06 $24.12
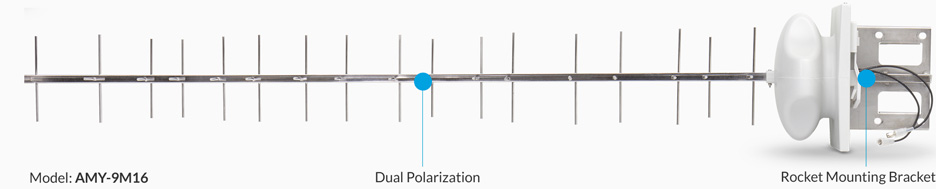
1 x 900 MHz 16 dBi MIMO Yagi Pair $319.31
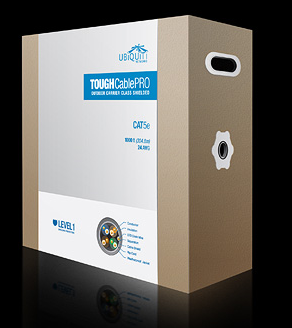
1 x 305m Grounded, External CAT5e (A-Tick) $246.51
---------
Sub-Total: $1,527.78
TNT (Road Express (5 - 12 Day Road Freight)): $162.59
Loss/Damage Cover: $22.95
Included GST 10.0%: $155.76
---------
Total: $1,713.32
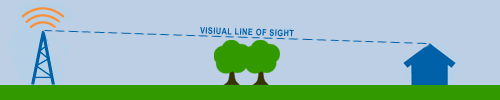
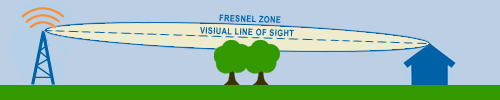
Trees (and any obstacle within the Fresnel Zone) affect RF in two ways:
The higher your frequency, the more opaque obstacles become; at "light"
frequencies obstacles are fully opaque. For maximum throughput, you must assure
you have a clear Fresnel Zone. If you do not have a clear Fresnel Zone,
then throughput will suffer.
5 GHz can actually get through a tree or two if signal levels are high enough.
However, not with 100 Mbps throughput. For that, you need a 100% clear Fresnel Zone.
2 GHz can actually get through a grove of trees if signal levels are high
enough. However, not with 100 Mbps throughput. For that, you need 100% clear Fresnel Zone.
900 MHz can actually get through a quarter mile of trees if you can get
the radios high enough to assure the Fresnel Zone does not intersect the ground,
even so you won't get 100 Mpbs throughput. For that, you need 100% clear Fresnel Zone.
How much loss is incurred impossible to precalculate due to the
complex nature of RF ray analysis. If there is an incursion to the Fresnel Zone
there is no authoritative way to predict how much of an impact it will have on
throughput (and latency) or overall performance. Experimentation is the only solution.
[Top][Home]

A Wireless Distribution System (WDS) lets you connect multiple access points
together. WDS allows the connected access points to communicate with each
other via wireless connection.
Wireless Distribution System:
https://en.wikipedia.org/wiki/Wireless_distribution_system
Note: When using WDS, it is possible that the maximum wireless throughput
may be halved after the first hop since one of the WAPs in a pair has to
retransmit the information during the communication of the two sides.
STEP 1: Configue the Rocket M server (ISP's router) end.
Configure this end first. I changed the SSID as wel so I copuld recognise it
later in STEP 2.
1. Choose the "Wireless" tab, and only change:

Wireless Mode: Access Point
WDS: [X] Enable
Click the Change button
2. Choose the "Network" tab, and only change:

IP Address: 192.168.5.30 (or IP address to suit your network)
Click the Change button
Click the Apply button
3. Reboot or power cycle the modem off and on before using this link for the first time.
To Configue the Rocket M client (remote) end.

1. Choose the "Wireless" tab, and only change:

Wireless Mode: Station
WDS: [X] Enable
Click the Change button

2. Choose the "Network" tab, and only change:

IP Address: 192.168.5.31 (or IP address to suit your network)
Click the Change button. The "change" button only changes the page display.
If you do not click "Apply" all is lost on reboot.

3. Click Apply. This forces a reboot. Be patient it take a unusually long time
to reboot.

4. Reboot or power cycle the modem off and on before using this link for the first time.